
Moonshine Still
My experience make'n some 'shine!
|
Back in 1979 and '80 I participated in a 4-H exchange trip that took me to Tennessee during the summer of my Senior year. I had always heard of moonshine through the movies and casual conversation. It peaked my interest because of the secrecy that surrounds it and how it could be brewed by anyone. Over the years I've always had a small interested in it and even discovered that my Dad had a small still while he was in college. With the advent of the Internet I found that stills were readily available on auction sites such as eBay. After watching the auction listing for a while I found a listing for a small still. This was exactly what I was looking for. Two weeks of anticipation, a high bid and I had a still! Once I got the still I set about in ernest looking for the all the components required to "cook a little 'shine". In April of 2001 I finally gave into the temptation and began the process. What follows is an account of what happened and how the liqueur turned out. For reference material I searched the Internet for information and purchased a reference book called "Foxfire Volume 1" which had a chapter about Moonshining. The only problem with all the recepies and instructions that I found was that they were designed for mixing up 55 to 100 gallons of mash at a time. My still will probably cook 1 to 1 1/2 gallons at a time. So my first task was to determine what equipment I needed and how much of what to use for each batch. The ingredient quantity turned into an 'educated guess'. |
|
|
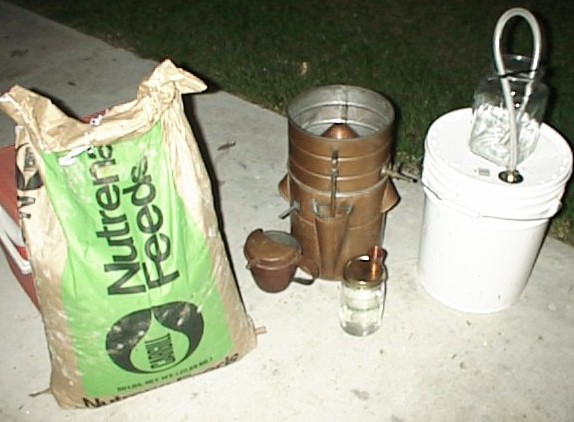
For equipment here's what I acquired.... 1. The still itself (which included the catch cup and a shot glass) 2. A 5 gallon plastic bucket with a removeable air tight lid. 3. A 1/2 inch pipe thread to 1/4 inch flex hose adapter 4. A flex hose clamp 5. 1 1/2 foot of flex hose 6. A jar for bleading the gas from fementing bucket 7. A propane burner 8. A propane tank and connection hose with regulator 9. Bilge pump 10. 8 foot of hose for cooling water 11. Large ice chest (minus lid) to hold cooling water (curtesy of IH-10 shoulder) 12. 12volt battery to run pump For ingrediants I used the following.... 1. 25lbs sack of cracked corn from local feed store (only used about 8lbs) 2. 4lbs sugar 3. small jar of activated yeast 4. water |
|
|
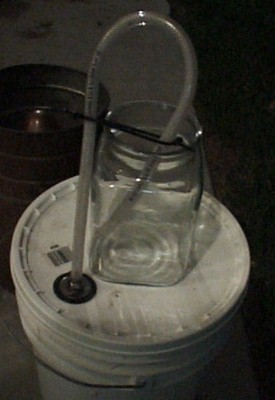
Make'n the mash I started with a Magnilite roasting pan that I assume holds some where in the vacinity of 2 gallons. In this I filled it a little more than half full of water, set it on the stove and got the water to boiling under high heat. Once I had a good rolling boil, I added 7 one pound butter canisters full of cracked corn to it and then kept the mixture stirred to prevent it from sticking until it was boiling again. I reduced the fire to a medium heat let this mixture boil for approximately 15 minutes. To this I added 4lbs of sugar (one sack). Again I let this mix come to a boil and then let it boil for approximately 5 minutes. I removed this from the stove and poured the mix into my 5 gallon fermenting bucket. Add then added 3 more servings of cracked corn as I didn't think I had enough the first time and then water to fill the bucket to about 6 inches from the top. I stirred the mix as I added the remaining water and this cooled the liquid to a luke warm state. To this I added one jar of activiated yeast and mixed it well. Make sure the mix is only warm when adding the yeast or you'll kill the yeast. I placed the lid on the bucket and and setup the bleeding hose. The picture at the left is the fermenting bucket and bleeding jar setup. Once you have the lid on and jar in the correct place, simply fill the jar about 3/4 full of water. This setup allows for the gas created in the fermenting process to escape by bubbling through the water but does not allow for outside air to get into the fermenting bucket. I was quite amazed to see bubbles in the bleeding jar within two hours of sealing the lid. I expected to see this but not until much later. Day 2 - Fermenting and preparing the still The next day the bubbles were still coming steady although not as fast and by the evening hours (approximately 18 hours later) the bubbles all but stopped. At this point I didn't know if I should be trying to distill it or let it ferment. I opted to let it ferment and discuss it with a few other people. |
|
Day 3 thru 5 - Fermenting continues and remaining still parts accumlated and assembled. Since I decided that it should ferment a while longer, I left the bucket alone and resisted the temptation to open it up and look in it. Of course the smell of what was bleeding off helped this decision somewhat. While this was happening I did a little midnight requisitioning and acquired a bilge pump from my dad's boat and a battery from a small tractor we had stitting. The propane tank and hose I borrowed from a gas grill. The diagram on the right shows how the distillation process works on this still. |
|
|
Day 6 - Run'n the mash Well the fatefull day arrived and it was time to set it all up and see what happened. To the left is a diagram of the setup. First I poured a little over a gallon of mash into the cook pot and placed it on the burner. I tried to pour as little corn components as possible to keep it from sticking to the bottom and burning. I lit the burner and started the cooking process. Using a thermometer I slowly brought the temperature up with out the condensor (top portion) on the still. This allowed for the 'yucky' stuff to boil off first. Once I reached a temp at the bottom range for alcohol distillation I then put the top on it. I am not disclosing the range of temperatures that I used in the process for two reasons; 1) I am not 100% sure the temp range I used was correct and 2) using the wrong ranges is a health risk. So, if your gonna make 'shine this part you'll have to discover on your own. Sorry. I kept the burner at a low level to keep the temp from rising too quickly in the pot. While basic physics will keep the contents from boiling away too fast, I wanted to minimize the amount of water that boiled off to a minimum. turning on the bildge pump the cool water moved from the cooler to the LOWER inlet filling the top and draining out the upper outlet. The side vent on the Cooker Portion is where I gauged the temp. The Cool Down Valve allows for you to add a bit of cool water if the temp rises too fast. In hindsight, I would get a good temp probe and mount it through the wall of the Cooker Portion for a more accurate reading. I then simply let the mash boil until the upper temp range was reached. At which time I removed the heat, poured out the spent mash, poured in some new mash and started the process over, repeating until I was out of mash. This process created about 1 quart of shine. Day 7 - After sitting in a mason jar over night, I noticed there was two 'layers' of liquid in my jar. A top clear liquid and a lower 'milky colored' one. I slowly poured off the top clear portion through a coffee filter into another mason jar and set that aside to 'age'. I suspect that varying the receipt a more optimum mash/alcohol ratio could be acheived. Day 14 - After ageing it 7 days, I poured a shot and tasted it. Just like I remembered! I then took a small portion and poured it onto a small saucer and put a match to it! Woof! How's that for a proofing test! Now, years later, I still have a small amount of shine in the mason jar and pull it out every now and then for the brave souls that wish to try some. |